The discussion of the Alien series of films and the props used in them is the aim, but if it's got Big Bugs and Big Guns, then they are welcome too!


Forum locked This topic is locked, you cannot edit posts or make further replies.  [ 27 posts ]  Go to page 1, 2  Next
Author Message
 Post subject: Could use some help putting the rest of my gun back together
PostPosted: Mon Nov 18, 2019 7:48 pm 
User avatar

Country: United Kingdom
I managed to get the gearbox back together and it seems to cycle and fire fire now when hooked up to a battery - all good - but I've got all these bits left and I don't know where they go, some seem to be exclusive parts to the snow wolf pulse rifle / casing like the safety and semi/auto levers, and then there's a couple of tiny springs and a tiny brass nub that I have no idea where they go. The pictures in the manual are too small and they never take the gearbox out of the shell in the manual anyway, nor can I find any youtube clips of the process so I'm hoping someone who knows what they are doing can just intuitively figure it out. Like, please take a look at the pics, maybe save one and just draw some lines from the parts to where you think they should go in MS paint and re-upload for me. Especially confused about the springs/brass nub and bit of plastic.


https://imgur.com/a/29S4BiK

Thanks in advance.


Top
 Profile  
Reply with quote  
 Post subject:
PostPosted: Tue Nov 19, 2019 12:11 am 
User avatar

Country: United Kingdom
Please, if anyone could even just point me towards some topics where someone has took apart and reassembled their snow wolf with pictures that would be a GREAT help. I am desperate here. If I can't get this back together I've got a £300 / $388.52 paperweight.


Top
 Profile  
Reply with quote  
 Post subject:
PostPosted: Tue Nov 19, 2019 12:27 am 
THAT guy
User avatar

Location: Virginia
Service Number: A03/TQ2.0.02146E1
Country: United States
Ive actually done this dozens of times. I will try to throw some drawings on to your pics and post up some arrows and descriptions and stuff. Unless someone beats me to it, I'll try to get something worked up in the morning.


Top
 Profile  
Reply with quote  
 Post subject:
PostPosted: Tue Nov 19, 2019 1:58 am 
User avatar

Country: United Kingdom
Oh my god thank you. I doubt anyone else will because I've been after this for months, so yes, please do.


Top
 Profile  
Reply with quote  
 Post subject: Re:
PostPosted: Tue Nov 19, 2019 2:12 am 
THAT guy
User avatar

Location: Virginia
Service Number: A03/TQ2.0.02146E1
Country: United States
paradoxum wrote:
Oh my god thank you. I doubt anyone else will because I've been after this for months, so yes, please do.


Sorry I'd have tried to help sooner but since I don't actually do airsoft, this is the sub forum i check the least often. Hopefully I can get something slapped together here soon


Top
 Profile  
Reply with quote  
 Post subject:
PostPosted: Tue Nov 19, 2019 2:21 am 
User avatar

Country: United Kingdom
as long as it takes man because so far you're the only one that has offered help with this part. I've got notifications on this anyway.

I was sure I took a video of me taking it apart first so I knew what I was doing putting it back together but can't find it.


Top
 Profile  
Reply with quote  
 Post subject: Re: Could use some help putting the rest of my gun back toge
PostPosted: Tue Nov 19, 2019 3:16 pm 
THAT guy
User avatar

Location: Virginia
Service Number: A03/TQ2.0.02146E1
Country: United States
OK, this may be a bit rough. This was from memory.

Tonight I will try to clarify some things. I do actually have a loose gearbox in a drawer somewhere and will try to get you a pic of the safety parts in their proper position. Also I marked the screws that I can't remember with an asterisk (*). I am pretty sure those 3 are the three that hold the metal housing together.

Im a bit fuzzy on the trigger off the top of my head too and the pics are too dark to jog my memory. Suffice to say, I will pull out my loose gear box tonight and hopefully clear up my hazy spots tomorrow. Hopefully this is enough to get you started

Attachment:
T0QLF7c.jpg
T0QLF7c.jpg [ 1.16 MiB | Viewed 6753 times ]

Attachment:
W5xs2mx.jpg
W5xs2mx.jpg [ 961.26 KiB | Viewed 6753 times ]


Top
 Profile  
Reply with quote  
 Post subject:
PostPosted: Tue Nov 19, 2019 3:19 pm 
User avatar

Country: United Kingdom
Thanks a ton, will get to work on it a bit later after work based on those or wait until you get more info up, if you need me to take pics of the other side of the gearbox or anything I can do that.

I tried slotting the gearbox back into the receiver but it won't go in with the motor attached so I'm assuming I need to remove that first and then slot it in, anyway again thanks a lot for doing this.


Top
 Profile  
Reply with quote  
 Post subject: Re: Could use some help putting the rest of my gun back toge
PostPosted: Tue Nov 19, 2019 3:56 pm 
THAT guy
User avatar

Location: Virginia
Service Number: A03/TQ2.0.02146E1
Country: United States
I actually just found this online and it helps show the position of the auto/fire and safety bits. I think I have them listed backward up there.

Attachment:
9424_[CYMA]_M1A1_Thompson_Airsoft__AEG_Gearbox_1.jpg
9424_[CYMA]_M1A1_Thompson_Airsoft__AEG_Gearbox_1.jpg [ 113.26 KiB | Viewed 6750 times ]

The key is that the plastic tab/latch should slide freely left and right.
-one post base should rotate and push the black plastic prong forward blocking the trigger from pulling (the safety).
-the other should rotate and lift the metal arm up (enabling full auto vs. semi).
-both post bases should be nearly flush on the outside when pushed in (with the recessed semi-circle/crescent facing out. That is where the actual knobs rest and screw down AFTER it has been put back into the main lower)

Also:
-I think your silver screws (unmarked on my edits) hold more of the metal gearbox housing together.
-The unmarked long black screw with the course threads should be for a plastic part. Maybe I can figure out which one tonight, but those course threads don't go in metal parts. It is probably trigger housing related.


Top
 Profile  
Reply with quote  
 Post subject:
PostPosted: Tue Nov 19, 2019 4:02 pm 
User avatar

Country: United Kingdom
Thank you again, all of this is very helpful. It looks like I may have gotten some parts on the gearbox the wrong way around although I can't see what the difference would be, these bits:

I think I have them essentially the opposite way around, but they fit and the gun cycles and fires seemingly fine regardless, I wonder if it matters or not. (image attached of the parts I mean)

If so it just means I need to open the gearbox again and re-orientate them, but now I know what I'm doing inside the gearbox it should be a quick fix.

9424_[CYMA]_M1A1_Thompson_Airsoft__AEG_Gearbox_1.jpg
9424_[CYMA]_M1A1_Thompson_Airsoft__AEG_Gearbox_1.jpg [ 67.15 KiB | Viewed 6749 times ]

Top
 Profile  
Reply with quote  
 Post subject:
PostPosted: Tue Nov 19, 2019 4:11 pm 
User avatar

Country: United Kingdom
When you say I'm missing a friction pin, is that THIS part? (circled red).

I've hoovered the place a few times since taking it apart so there's no chance of finding it again. does this mean one of the switches (safety / semi/auto) won't work? know anywhere I can get a replacement by any chance?

My local airsoft site has you remove any magazines in the safe area anyway so the safety isn't paramount, I'd prefer the semi/auto switch to work over that as I have good trigger discipline anyway - it looks like that little brass nub somehow fits to the tiny spring - so have I also lost one of the tiny springs too?

T0QLF7c.jpg
T0QLF7c.jpg [ 1.16 MiB | Viewed 6742 times ]

Top
 Profile  
Reply with quote  
 Post subject:
PostPosted: Tue Nov 19, 2019 4:40 pm 
User avatar

Country: United Kingdom
https://www.youtube.com/watch?v=jiRDbTAgKxU

https://www.youtube.com/watch?v=yshk6_RxpMI&t=1s

https://www.youtube.com/watch?v=inKXNDSt95w

https://www.youtube.com/watch?v=tn3eJW_vygU&t=61s

any of these any help? thanks again


Top
 Profile  
Reply with quote  
 Post subject: Re:
PostPosted: Tue Nov 19, 2019 5:00 pm 
THAT guy
User avatar

Location: Virginia
Service Number: A03/TQ2.0.02146E1
Country: United States
paradoxum wrote:
When you say I'm missing a friction pin, is that THIS part? (circled red).

I've hoovered the place a few times since taking it apart so there's no chance of finding it again. does this mean one of the switches (safety / semi/auto) won't work? know anywhere I can get a replacement by any chance?

My local airsoft site has you remove any magazines in the safe area anyway so the safety isn't paramount, I'd prefer the semi/auto switch to work over that as I have good trigger discipline anyway - it looks like that little brass nub somehow fits to the tiny spring - so have I also lost one of the tiny springs too?


Yes, the red circle is pin that fits on the tiny spring and fit up inside the selector knob. It actually isnt that big a deal. It WILL funtion. It will just no longer 'click' into place. You will lose the tactile feeling of the bar swinging over and clicking into position. That little pin just pushes against the body of the lower until it hits a little indented spot. It helps keep the knob from wandering on its own, but it does not effect the ability for the knob to rotate (nor harm the function). Hopefully that makes sense.

Now, it is possible you havent lost it. They dont *always* pop out. Check the base of the safety/fire select knobs and look in the hole. Maybe you got lucky and the 2nd set is still inside the knob. If it is gone I have no idea where to buy that part, but you may not even miss it. Mostly it just gives you the 'click'.


Top
 Profile  
Reply with quote  
 Post subject: Re: Re:
PostPosted: Tue Nov 19, 2019 6:15 pm 
User avatar

Country: United Kingdom
bigbisont wrote:
paradoxum wrote:
When you say I'm missing a friction pin, is that THIS part? (circled red).

I've hoovered the place a few times since taking it apart so there's no chance of finding it again. does this mean one of the switches (safety / semi/auto) won't work? know anywhere I can get a replacement by any chance?

My local airsoft site has you remove any magazines in the safe area anyway so the safety isn't paramount, I'd prefer the semi/auto switch to work over that as I have good trigger discipline anyway - it looks like that little brass nub somehow fits to the tiny spring - so have I also lost one of the tiny springs too?


Yes, the red circle is pin that fits on the tiny spring and fit up inside the selector knob. It actually isnt that big a deal. It WILL funtion. It will just no longer 'click' into place. You will lose the tactile feeling of the bar swinging over and clicking into position. That little pin just pushes against the body of the lower until it hits a little indented spot. It helps keep the knob from wandering on its own, but it does not effect the ability for the knob to rotate (nor harm the function). Hopefully that makes sense.

Now, it is possible you havent lost it. They dont *always* pop out. Check the base of the safety/fire select knobs and look in the hole. Maybe you got lucky and the 2nd set is still inside the knob. If it is gone I have no idea where to buy that part, but you may not even miss it. Mostly it just gives you the 'click'.


Oh thanks that's great, I never actually even noticed a click when switching modes on either switches but as long as they still function that's pretty good. I plan to get a whole new snow wolf PR in the future (long future) sometime and just swap my gearbox and barrel/hopup etc with it so I've got a 'clean, but upgraded' one, but I'm talking like 6 months down the line as I'm strapped for cash at the moment. Haven't got the table out yet and looked at it putting shopping away / walking dogs right now etc but I really do appreciate all this help.

Thanks again,
para


Top
 Profile  
Reply with quote  
 Post subject:
PostPosted: Tue Nov 19, 2019 7:25 pm 
User avatar

Country: United Kingdom
Got the workbench out and laid everything out again atop some white towels so you can see clearer and took a load more pics, here is the album:

https://imgur.com/a/pyafymk


Top
 Profile  
Reply with quote  
 Post subject: Re: Could use some help putting the rest of my gun back toge
PostPosted: Wed Nov 20, 2019 5:33 pm 
THAT guy
User avatar

Location: Virginia
Service Number: A03/TQ2.0.02146E1
Country: United States
Well, I have my spare gearbox in front of me, but it has some differences.
-The gold oval you circled in red above doesn't exist on mine. It just has 3 sets of matching bearings for all the gears. There is no gold oval that might be flipped. So not everything is a perfect match.
-I don't recall how to put the magazine release spring back in. I sold the backup lower I had a long time ago and just cant remember.
-I have no clue what those 2 x chrome screws are. I have nothing remotely similar on the gearbox in front of me.

But what I DO feel pretty confident in is below.

Image 1
Attachment:
2kt5mSJ.jpg
2kt5mSJ.jpg [ 468.46 KiB | Viewed 6689 times ]


NOTES:
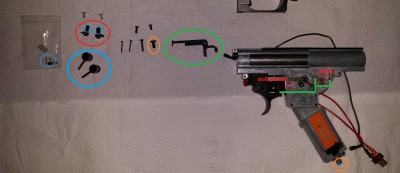
*The BLUE parts are external to the lower of the Thompson. Set them aside.
- The selector post bases (with red arrows in red circle) should separate from the inner post (circled in blue).
- Their should be a small screw on top of the inner post that you can back out to get the base free.
*The RED parts needed are the post bases only (not the blue circled inner post). You want a base with circle plug side down in the RED holes and recessed crescent side of the bases facing up (to be lined up with the Thompson lower holes after gearbox stuffed back in there)
- The more complicated shape is the fire selector and goes closer to the trigger. It should be positioned so that as you rotate back and forth it the metal arm
lifts and lowers.
- The more simple shape is the safety. As you rotate it back and forth the GREEN part should slide back and forth blocking the trigger from pulling.
*The GREEN part should be positioned roughly as drawn (crude, but hopefully clear). As stated, it should slide back and forth freely.
*The ORANGE is the grip screw. I would just screw that into the handle area to get it out of the way until you are ready to reattach grip.

Image 2
Attachment:
4kXAmYB.jpg
4kXAmYB.jpg [ 564.09 KiB | Viewed 6689 times ]


NOTES:
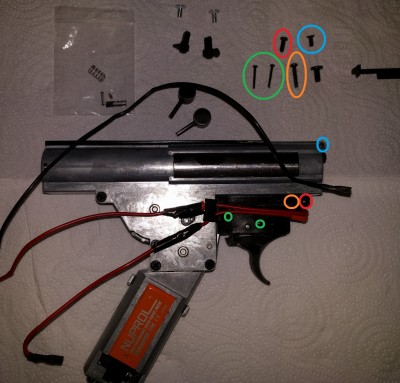
*I am now pretty sure the GREEN screws go into the main body of the trigger housing (differs from previous advice above)
* The ORANGE screw goes in the front of the trigger housing. I was correct above when I said it goes strictly into plastic-on-plastic parts.
*The RED screw is most likely the front lower gearbox housing screw. On mine it is the longer of the two as it also catches a tab of the plastic trigger houseing on its way to the metal housing halves.
*The BLUE screw is most likely the front top housing screw. It is shorter as it just needs the two halfs. I will say though, the screw on mine matches in length, but not style. The one in the picture looks like it is a flat head screw where mine is a button head. So go gently with that one to make sure it threads in correctly and wasn't mixed up from something else.


Once you get all that slapped together and tucked back into the lower:
-Attach the 'inner posts' (in small blue circles from image 1) back into the bases (red from image one) from the outside of the 'lower'.
-Put the selector switches back on over the inner posts and tighten with the 'set screw' that is hopefully still attached (take note to make sure tiny spring and pin are in there if you still have them. They go on the underside of the selector switches)


Top
 Profile  
Reply with quote  
 Post subject: Re:
PostPosted: Thu Nov 21, 2019 7:06 am 

Location: U.S.A.
Country: United States
paradoxum wrote:
as long as it takes man because so far you're the only one that has offered help with this part. I've got notifications on this anyway.

I was sure I took a video of me taking it apart first so I knew what I was doing putting it back together but can't find it.


If you look at the previous threads that you posted in, you would notice that I sent you a link to the assembly/disassembly of the gun but here it is again:

http://www.plecterlabs.com/Media/Doc/M4 ... Manual.pdf


Top
 Profile  
Reply with quote  
 Post subject:
PostPosted: Thu Nov 21, 2019 12:06 pm 
User avatar

Country: United Kingdom
correct me if i'm wrong but I can't see them ever taking the gearbox out of the receiver in that? they separate the top half with the barrel from the bottom half of the receiver but I don't see any pages with the gearbox coming out and how the switches go in etc, if I've missed it what page should I be looking it? which is where I think all the parts I have lying around go

thanks


Top
 Profile  
Reply with quote  
 Post subject: Re:
PostPosted: Thu Nov 21, 2019 1:04 pm 

Location: U.S.A.
Country: United States
paradoxum wrote:
correct me if i'm wrong but I can't see them ever taking the gearbox out of the receiver in that? they separate the top half with the barrel from the bottom half of the receiver but I don't see any pages with the gearbox coming out and how the switches go in etc, if I've missed it what page should I be looking it? which is where I think all the parts I have lying around go

thanks


No, but in one of your two page threads you specifically link to the video which has the layout for the external parts of the gearbox:

https://m.youtube.com/watch?v=yshk6_RxpMI

That video is very good for assembly of the gearbox, including the outer peices.


The post in this question is the November 13 post:

viewtopic.php?f=4&t=18519&start=25


Top
 Profile  
Reply with quote  
 Post subject: Re: Re:
PostPosted: Thu Nov 21, 2019 3:41 pm 
User avatar

Country: United Kingdom
Whamhammer wrote:
paradoxum wrote:
correct me if i'm wrong but I can't see them ever taking the gearbox out of the receiver in that? they separate the top half with the barrel from the bottom half of the receiver but I don't see any pages with the gearbox coming out and how the switches go in etc, if I've missed it what page should I be looking it? which is where I think all the parts I have lying around go

thanks


No, but in one of your two page threads you specifically link to the video which has the layout for the external parts of the gearbox:

https://m.youtube.com/watch?v=yshk6_RxpMI

That video is very good for assembly of the gearbox, including the outer peices.


The post in this question is the November 13 post:

viewtopic.php?f=4&t=18519&start=25


thanks, I've got a shitty memory (severe adhd) so I often forget things unless I write it down on a sticky note or something, don't mean to be a pest with this stuff, I really appreciate everyones help, I couldn't do it without you guys - going to get it done by tonight hopefully.

Annoyingly though my mosfet doesn't seem to work at all so I need to send it back for a replacement which means I'll have to open it up again when I get the new one, but since I just need to chop the wires off the trigger contacts and wire the double sensor wire to those coming from the trigger, removing the gearbox and all that shouldn't be necessary right? or should I add some longer wires to the trigger now while it's open and thread them up and leave the loose bits behind the gearbox in the receiver and use those?


Top
 Profile  
Reply with quote  
 Post subject:
PostPosted: Thu Nov 21, 2019 7:14 pm 
User avatar

Country: United Kingdom
progress:
https://imgur.com/a/2NfuqNI

https://i.imgur.com/JcHxO3C.jpg

It fires with a magazine in!

However there appears to be some kind of feeding issue, where after I stop pulling the trigger there's a single BB or two left in the barrel that rolls out. Any ideas off the top of your heads that know why?
The MOSFET I wanted to install, which needs returning to be replaced, is a NanoAAB, which has 'Active Breaking':

"ACTIVE BRAKE

Do you care about realism? Would you like to increase the life of the gearbox? Does your rifle have such a high rate of fire that you are not able to make a single shot? The Active Brake sorts things out. In SEMI Mode, the brake does not allow for compressing a piston after a shot. The piston will stop in the front position which eliminates unnecessary stresses, increasing the service life of the gearbox and its parts. This is important, especially with an AEG power upgrade. After releasing the trigger, the rifle immediately stops firing. So, you gain more realism and, additionally, you do not waste your precious ammunition."

I am HOPING that if the mosfet was installed / when I get the new one and plug it in, this will resolve that issue, because it sounds like the increased power from the motor and new spring could be causing it? But I am just guessing here. aside from that it seems to work fine so my care level on that issue is about 2/10 right now. I've also got a bunch of screws leftover that must go somewhere so I might take it apart again and see what I missed, but for now I'm just glad it runs. Safety and semi/full auto switches work (forgot to put the tiny spring with brass nub in one of them, the other pair I must have lost) fine.

https://imgur.com/a/8wQ2jjm


Top
 Profile  
Reply with quote  
 Post subject: Re: Could use some help putting the rest of my gun back toge
PostPosted: Fri Nov 22, 2019 2:17 am 

Location: U.S.A.
Country: United States
Increased power wont cause feeding issues; nozzle/hop up alignment, tappet plate issues, are the most common culprits.

When you put the gearbox back together, did you put the tappet plate spring back in correctly?

Something is keeping the nozzle held back long enough for it to allow a second to come in, after the gearbox has shot the air into the barrel.


Active braking normally only helps out with semi auto shooting, Gate warned on its Warfet instructions that it could be harmful if used for full auto. I keep AB mode off on my guns, even though I mostly do semi.

As far as extra nuts/bolts/screws, look at that assembly guide I forwarded the other day, it should show every nut and bolt in it.


Top
 Profile  
Reply with quote  
 Post subject:
PostPosted: Fri Nov 22, 2019 2:33 am 
User avatar

Country: United Kingdom
It's possible that the piston / nozzle part wasn't done correctly with the new spring, but if it fires does that not mean it's working fine? or could it just be working half-fine?

I remember when putting the two halves of the gearbox back together I was wondering what position I should have the piston in before securing the halves together, but no matter if I left it all the way forward or at the back of the gearbox, when the gears spin it seemed to work fine (as in, the gears spin and the piston goes back and forth), so I'm not sure. Now that I know it's not that complicated to put back together I will open it up again when I get the new mosfet to install that (right now I'm just glad it fires so I can go and play - I've got a golden eagle M870 shotgun which is supposed to be my teriary weapon which could be my primary, but anyway I'm planning to get the gun back together with the shell by sunday and go and play then with it and my golden eagle M870. I've got it mounted in a leather holster on my hydration pouch on my back like hicks in Aliens :) "I like to keep this handy *pumps* for close encounters" etc :D but yeah. Also I have a couple wires in the ammo counter sensor mixed so it isn't sensing shots but that just means I need to cut and resplice the two wires opposite what they are and it should work, but really when playing the ammo counter ... counts for shit, heh. It's really just if anyone comes up in the safe zone and has a close up look at the gun etc.


Top
 Profile  
Reply with quote  
 Post subject:
PostPosted: Sat Nov 23, 2019 9:02 am 

Service Number: A05/TQ2.0.32141E1
Country: United States
https://www.youtube.com/watch?v=zBAJfH_9XMA&t=1433s
https://www.youtube.com/watch?v=V6F9KSU7yKE&t=6s
https://www.youtube.com/watch?v=Y9bAz8FDGkk

_________________
The impossible takes a while longer and goes over budget too...


Top
 Profile  
Reply with quote  
 Post subject:
PostPosted: Sat Nov 23, 2019 9:03 am 

Service Number: A05/TQ2.0.32141E1
Country: United States
I got mine apart and back together. Now how on earth do you take the Thompson apart in the evike setup? I am not seeing and option to undo any screws and is almost appears glued/stamped together as one piece.

_________________
The impossible takes a while longer and goes over budget too...


Top
 Profile  
Reply with quote  
Display posts from previous:  Sort by  
Forum locked This topic is locked, you cannot edit posts or make further replies.  [ 27 posts ]  Go to page 1, 2  Next


You cannot post new topics in this forum
You cannot reply to topics in this forum
You cannot edit your posts in this forum
You cannot delete your posts in this forum
You cannot post attachments in this forum

Search for:
Jump to: