The discussion of the Alien series of films and the props used in them is the aim, but if it's got Big Bugs and Big Guns, then they are welcome too!


Post new topic Reply to topic  [ 353 posts ]  Go to page Previous  1 ... 11, 12, 13, 14, 15  Next
Author Message
 Post subject:
PostPosted: Sun Jan 07, 2024 4:36 pm 
Harvester of Sorrow
User avatar

Location: Lancashire (Wirral born)
Service Number: A04/TQ1.0.32156E1
Country: United Kingdom
Might just be me but the newer pics aren’t loading

_________________
Image AKA: Simon


Top
 Profile  
Reply with quote  
 Post subject: Re:
PostPosted: Sun Jan 07, 2024 7:29 pm 
88reaper88 wrote:
Might just be me but the newer pics aren’t loading


Hi 88Reaper88 - thanks for the heads up. it looks like quite a few aren't showing.. I think the source images may be too large for this forum. I'll check it out.


Top
 Profile  
Reply with quote  
 Post subject:
PostPosted: Sun Jan 07, 2024 8:56 pm 
User avatar
Yea that whole last page isn't loading

_________________
still alive


Top
 Profile  
Reply with quote  
 Post subject: Re:
PostPosted: Sun Jan 07, 2024 11:15 pm 
metalalien wrote:
Yea that whole last page isn't loading


Hmmm, weird. It's loading OK for me now, on Chrome and MS Edge on Windows. I'm getting some errors on my iPad though. I'll see if I can sort it.

Ah, I think I've got an idea - I host my own images if I can and I think this forum is blocking them (maybe they're too big?). I'll work to re-attach those that are missing but for now I'll concentrate on those from my last progress post.


Top
 Profile  
Reply with quote  
 Post subject:
PostPosted: Mon Jan 08, 2024 2:20 am 
Moderator & screen used
User avatar

Location: United Kingdom
Service Number: A08/TQ1.0.02136E1
Country: United Kingdom
The only images I (and most likely everyone else) can see are ones that you've uploaded as attachements here to the board. All the images you're linking to gmanx.com aren't working for some reason. If I take a sample image URL that you've posted I get this:

"Secure Connection Failed. An error occurred during a connection to gmanx.com. Peer’s Certificate has been revoked. Error code: SEC_ERROR_REVOKED_CERTIFICATE The page you are trying to view cannot be shown because the authenticity of the received data could not be verified. Please contact the web site owners to inform them of this problem."

You may be able to see them yourself as you're presumably logged in to an account at gmanx.com - that's just my guess anyway!

Harry

_________________
Image
http://www.facebook.com/TheHHACA - @TheHHACA


Top
 Profile  
Reply with quote  
 Post subject: Re:
PostPosted: Mon Jan 08, 2024 3:55 am 

Service Number: A05/TQ2.0.32141E1
Country: United States
Harry Harris wrote:
The only images I (and most likely everyone else) can see are ones that you've uploaded as attachements here to the board. All the images you're linking to gmanx.com aren't working for some reason. If I take a sample image URL that you've posted I get this:

"Secure Connection Failed. An error occurred during a connection to gmanx.com. Peer’s Certificate has been revoked. Error code: SEC_ERROR_REVOKED_CERTIFICATE The page you are trying to view cannot be shown because the authenticity of the received data could not be verified. Please contact the web site owners to inform them of this problem."

You may be able to see them yourself as you're presumably logged in to an account at gmanx.com - that's just my guess anyway!

Harry


That sounds like a certificate issue with the webhost. And the reason we ask to have the images uploaded here directly is that it fixes issues later down the road when the file host goes titanic...

_________________
The impossible takes a while longer and goes over budget too...


Top
 Profile  
Reply with quote  
 Post subject: Re: 1:18 scale M557 APC scratch-build
PostPosted: Fri Jan 12, 2024 6:55 pm 
Thank you all for your observations. I'm definitely having issues with this current webhost.

I'll edit / reupload my latest with attachments instead. :)


Top
 Profile  
Reply with quote  
 Post subject: Re: 1:18 scale M557 APC scratch-build
PostPosted: Fri Jan 12, 2024 11:20 pm 
I’ve wanted to add some paint detail to the cabin for a long time so today was the day. Here’s a before:

Attachment:
APC_24011101.jpg
APC_24011101.jpg [ 208.19 KiB | Viewed 86925 times ]


I’ve noticed that military vehicles have a host of labelling in the interior - so I broke out the sticky label and bic pen.

Attachment:
APC_24011101.jpg
APC_24011101.jpg [ 208.19 KiB | Viewed 86925 times ]


Attachment:
APC_24011102.jpg
APC_24011102.jpg [ 267.86 KiB | Viewed 86925 times ]


..and here’s the after - still a little wet just after a dark spirit wash.

Attachment:
APC_24011103.jpg
APC_24011103.jpg [ 343.38 KiB | Viewed 86925 times ]


Door handle at left isn't painted yet tho.

APC_24011104.jpg
APC_24011104.jpg [ 247.19 KiB | Viewed 86925 times ]

Top
 Profile  
Reply with quote  
 Post subject: Re: 1:18 scale M557 APC scratch-build
PostPosted: Fri Jan 12, 2024 11:25 pm 
Had a couple of hours today to start wiring this thing properly. There's heat-shrink on exposed joins and Gorman's console is unpluggable if I want to work on it separately.

Attachment:
APC_24011201.jpg
APC_24011201.jpg [ 154.93 KiB | Viewed 86923 times ]


Attachment:
APC_24011202.jpg
APC_24011202.jpg [ 160.5 KiB | Viewed 86923 times ]


Attachment:
APC_24011203.jpg
APC_24011203.jpg [ 173.95 KiB | Viewed 86923 times ]


Top
 Profile  
Reply with quote  
 Post subject: Re: 1:18 scale M557 APC scratch-build
PostPosted: Sat Jan 13, 2024 4:54 am 

Location: Chicago
That is some crazy detail.
Stunning work.


Top
 Profile  
Reply with quote  
 Post subject: Re: 1:18 scale M557 APC scratch-build
PostPosted: Sat Jan 13, 2024 7:10 pm 
TS826 wrote:
That is some crazy detail.
Stunning work.


Thank you very much for the kind words, TS826. It always surprises me how well the interior pics turn out with me just jamming my phone in there and hoping for the best. :)


Top
 Profile  
Reply with quote  
 Post subject:
PostPosted: Tue Jan 23, 2024 6:12 am 
User avatar
Be sure to include a sharp stick for Hudson! Awesome work!

_________________
still alive


Top
 Profile  
Reply with quote  
 Post subject: Re:
PostPosted: Thu Jan 25, 2024 6:33 pm 
metalalien wrote:
Be sure to include a sharp stick for Hudson! Awesome work!


Haha - thanks metalalien, great idea! I must remember to add a sharp stick somewhere as a little easter egg, maybe tucked under Hudson's seat.


Top
 Profile  
Reply with quote  
 Post subject: Re: 1:18 scale M557 APC scratch-build
PostPosted: Sat Feb 03, 2024 2:48 pm 
The 4 helmets I've finished got a final detailing pass. I got my stand-in Apone to model one while he builds a gear load-out.

I hope I can get the rest of the armour made and painted to a similar state. I also completed the ammo crates - all ready for Gorman's cranium.

Image

Image

Image


Top
 Profile  
Reply with quote  
 Post subject: Re: 1:18 scale M557 APC scratch-build
PostPosted: Fri Mar 14, 2025 7:13 pm 
I've picked up this build again after a long hiatus and this is where I'm at currently.

Image

Image

Image

Image

I'd like to finish painting the exterior but will need to add the graphics on the front:

Left - 542 / GMTS
Right - 2D SULACO

Does anyone know what font I could use to design the scale / placement for these? I'll probably be brush painting the left side and using an airbrush mask for the large 2D.


Top
 Profile  
Reply with quote  
 Post subject:
PostPosted: Sat Mar 15, 2025 5:59 am 
User avatar
I love it so much!

_________________
still alive


Top
 Profile  
Reply with quote  
 Post subject: Re: 1:18 scale M557 APC scratch-build
PostPosted: Sat Mar 15, 2025 11:33 pm 
Thank you so much MetalAlien! I know there's not much traffic on this site but I'll continue to update until I'm done!


Top
 Profile  
Reply with quote  
 Post subject: Re: 1:18 scale M557 APC scratch-build
PostPosted: Tue Mar 18, 2025 7:44 pm 
Just a quick update today while I continue to scratch my head over the electrics for the APC.

I was worried about the battery boxes for 2 reasons:

1/ The switches included in them are very sketchy and inreliable.
2/ I'm concerned about the frailty of the solder connections.

My genius idea was to pul the switches out since I can just unplug them when not in use. Then I could secure the plug sockets into the battery box with hot glue which wiuld also stop the wiring getting tugged around.

My first attempt is on the left with the right one being a lot better once I got into my flow. :)

Image

As I was leaving to eat I thought I'd take a snap of the area I'm working in. There's an interesting take on the 'Live, Laugh, Love' posters at top-right.

Image


Top
 Profile  
Reply with quote  
 Post subject: Re: 1:18 scale M557 APC scratch-build
PostPosted: Fri Mar 21, 2025 11:04 pm 
Another small - but important - update. I needed to create a wiring bridge between the battery boxes since one powers the exterior lights, and the other covers the interior and I needed somewhere to hide wiring that could be removed if needed.

Image

Image

It turned out to be a nice little detailing exercise and I filled the underside of the 'bridge' with choice greeblies.

Image

Image

Image

They'll almost never be seen since I can't get my camera (my phone) in a good position once everything is closed down.

Image

Image

Anyway, I'll add some more detailed painting - picking out some items - then I can place all the wiring in there - out of sight of the passengers. :)


Top
 Profile  
Reply with quote  
 Post subject: Re: 1:18 scale M557 APC scratch-build
PostPosted: Thu Mar 27, 2025 10:29 pm 
Gosh, I really don't enjoy routing lighting electrics. Anyway, it has to be done - and we're nearly at the finish line for all of this spaghetti!

Image

That's a bit better - I just have to remember which plug goes into which socket.

Image

I've had to strip carefully applied heat-shrink off a couple of finished soldering jobs, disassemble them, and re-do them because I forgot to add other connections to the same plug or socket. Deep joy.


Top
 Profile  
Reply with quote  
 Post subject:
PostPosted: Sat Mar 29, 2025 5:43 am 
User avatar
Very very cool!

_________________
still alive


Top
 Profile  
Reply with quote  
 Post subject: Re: 1:18 scale M557 APC scratch-build
PostPosted: Sat Mar 29, 2025 5:04 pm 
Thanks Metalalien!

I was so relieved to finally finish the wiring, soldering etc that I just grabbed my iPad and shot this short (silent) video of the lighting in action. Of course there'll be much better footage later but I wanted to share the excitement I feel that this part is done!

https://www.youtube.com/watch?v=bDkQKCjRFIc


Top
 Profile  
Reply with quote  
 Post subject: Re: 1:18 scale M557 APC scratch-build
PostPosted: Wed Apr 09, 2025 10:07 pm 
A longer video this time - showing how the interior is fitted.

https://www.youtube.com/watch?v=G78C1nNdoXc

Aside from video, while I think about what needs finishing on this model I'll also be assessing the crew that I have, and I've definitely got work to do. :)


Top
 Profile  
Reply with quote  
 Post subject: Re: 1:18 scale M557 APC scratch-build
PostPosted: Sat Apr 12, 2025 10:06 pm 
It’s time to secure some of the more ‘floaty’ aspects of the interior. I used metal plates and magnets to fix the driver’s and gunner’s seats in place and I knew I had a plentiful supply of super tiny magnets (tiny is 2mm in diameter and 1mm tall) so they might come in handy here.

I wanted to keep the floor plates anchored to the floor. As luck would have it, the design I used to 3d print out the floor grills has ‘bolt heads’ at the corners of individual grills. These bolt heads are about the same size as my tiny magnets so I drilled out a couple in each floor plate, drilled corresponding holes in the actual floor of the APC, added tiny magnets to both and super-glued them in. That worked a treat! Plastic tweezers were essential but didn’t stop a couple of the tiny magnets pinging across the room. I suppose I’ll find them if I wear my steel toe-capped boots. :)

Image
Two ‘sticks’ of tiny magnets, floor plate, pin vice and plastic tweezers!

Image
You can just about see the two tiny round magnets in this image, above the large metal plates that secure the driver’s and gunner’s seats.

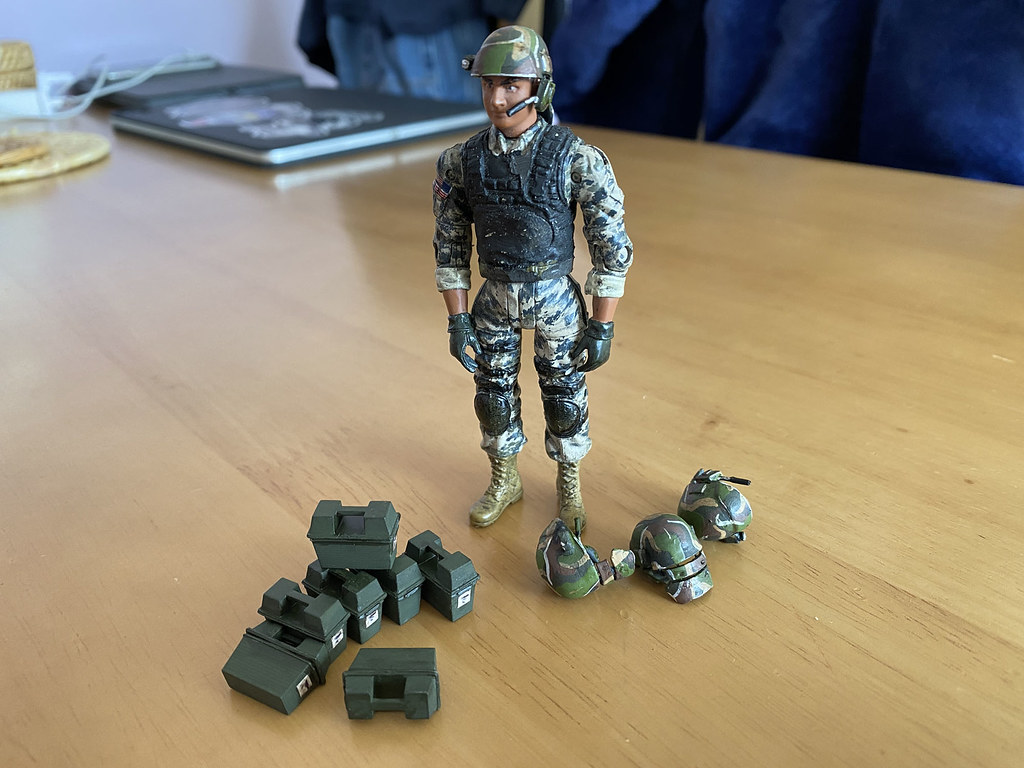
Next, I could do with anchoring the seating module that Ripley and Burke use which also contains the 2 auto sentry gun systems in their stowage crates. This piece of the model is a little large and heavy for my tiny magnets so I thought a more mechanical solution would be better. A double pin-and-slot sliding arrangement was the answer. It would place the seating unit snugly against the wall and allow it to be pulled up and out when needed. I built a bracket from styrene sheet which allows a brass rod to slide down it. This brass rod would be attached to the back of the seating unit.

Image
Bracket and rod.

Image
Bracket in place on the wall.

Image
Here’s the brass rod - put through the back of the seating unit and glued in place.The wall-mounted bracket it slides down into can be seen behind (partially painted green).

Image
Here it is in place - holding the seating in place quite securely.

I’ve since added small zip ties to the wiring loom in strategic places, leaving me access to the batteries and any other items I need to be able to remove, then added blobs of hot glue where I didn’t need / want wires to move around. Pics of that and more next time!


Top
 Profile  
Reply with quote  
 Post subject:
PostPosted: Tue Apr 22, 2025 2:55 pm 
User avatar
So we are gonna need you to build a to scale Dropship to house this beauty for ...... reasons!

_________________
still alive


Top
 Profile  
Reply with quote  
Display posts from previous:  Sort by  
Post new topic Reply to topic  [ 353 posts ]  Go to page Previous  1 ... 11, 12, 13, 14, 15  Next


You cannot post new topics in this forum
You cannot reply to topics in this forum
You cannot edit your posts in this forum
You cannot delete your posts in this forum
You cannot post attachments in this forum

Search for:
Jump to: